Last updated: August 21, 2026
Sewing advice assumes vocabulary. Drop the feed dogs, check the take up lever, is it a low shank, did you clean under the throat plate. If you are three weeks into owning a machine, those sentences are noise, and the manual diagram labels twenty parts without saying which ones you will ever touch.
So here is the machine in plain language, grouped by what each part does rather than by where it sits on an exploded diagram. Six parts you handle constantly, five you handle occasionally, and a few that exist mostly so that other people’s advice makes sense.
This article contains affiliate links. If you buy through them, we may earn a commission at no extra cost to you. Learn more.
Quick Answer
Which sewing machine parts do you actually need to know?
- Presser foot and its lever: holds the fabric down and, on most machines, opens the tension discs when raised.
- Feed dogs: the toothed bars that pull the fabric through. Your hands guide, they move.
- Take up lever and tension discs: the two points in the thread path where most trouble starts.
- Bobbin, bobbin case and needle plate: the underside of the stitch, and where lint collects.
Bottom line: learn six parts and most sewing advice becomes readable.
The Six Parts You Touch Every Session
Presser foot, presser foot lever, needle and its clamp, handwheel, feed dogs and bobbin. Those six are in play from the moment you sit down. Everything else on the machine either supports them or is a control you set once and forget for the rest of the project.
Worth saying early: none of these require tools beyond the small screwdriver in the accessory box, and none of them involve the electrical side of the machine. Anything behind the casing, wiring, the motor and the foot pedal internals, belongs to a repair shop rather than to a kitchen table.
Above the Needle Plate
This is the half you can see, and it holds the thread path and the fabric control. If a stitch is going wrong, this half is where you look first, because top thread problems outnumber bobbin problems by a wide margin.
Presser Foot, Lever and Shank
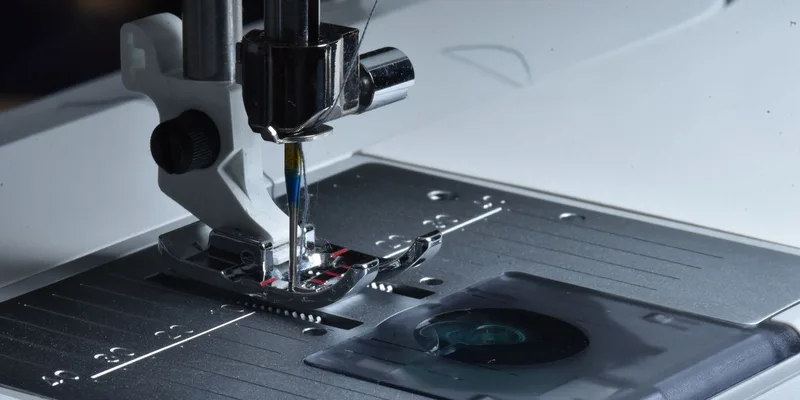
The presser foot is the small metal or plastic foot that presses the fabric against the feed dogs. It clips or screws onto the shank, the vertical bar behind it. Most home machines are low shank, some are high shank, and that distinction is what decides whether an accessory foot will fit.
The presser foot lever behind the machine raises and lowers it. On virtually all machines that lever also opens the tension discs when raised, which is why every threading guide starts with the foot up. Which feet are worth owning is covered in the presser foot guide.
Needle, Clamp and Threader
The needle sits in the clamp with its flat side facing the back on almost all home machines, pushed all the way up before the screw is tightened. A needle seated slightly low is a common cause of skipped stitches and of a needle threader that will not catch.
Needles are consumable. They blunt, they bend invisibly, and they are the single cheapest fix for a machine that has started misbehaving. Types and sizes are in the needle guide, and when to swap is in the change interval page.
Tension Discs and the Take Up Lever
The tension discs are a pair of plates inside the thread channel that squeeze the top thread and control how freely it feeds. The tension dial adjusts how hard they squeeze. Most of the time the correct setting is whatever the machine came with, and most tension complaints are actually threading errors.
The take up lever is the metal arm with a hole that rises and falls through a slot in the machine face. It pulls slack thread up after each stitch. Missing it while threading is a top three cause of instant thread breakage, and the tension page explains how to tell the two apart.
Below the Needle Plate
The underside does two jobs: moving the fabric and forming the lock. It also collects lint, which is why the area under the needle plate is the one bit of routine cleaning every machine needs regardless of brand or age.
Feed Dogs and the Needle Plate
Feed dogs are the small toothed bars that rise through slots in the needle plate, grip the fabric, move it back and drop away to return. They set the pace. Your job is steering, and pulling the fabric to help them is how needles bend and stitches skip.
Most machines can drop the feed dogs, either by a switch or by fitting a cover plate, for free motion quilting and darning where you move the fabric yourself. If your fabric is not advancing, check the feed dogs are up before assuming anything worse, as in the feeding checklist.
Bobbin, Bobbin Case and Hook
The bobbin holds the lower thread. Drop in bobbins sit in a cradle under a clear cover; front loading bobbins sit in a removable metal case behind a door. The hook rotates around the bobbin, catches the loop of top thread and pulls it around to form the lock.
Bobbins come in classes and are not interchangeable between machines. A slightly wrong bobbin rattles, changes tension unpredictably and can foul the hook, which is why the bobbin fitment guide is worth two minutes before you buy a bag of them.
Controls and What They Change
The dials and buttons on the front and right of the machine set stitch shape and behavior. The table lists the common ones with what they change in the seam, since the labels alone rarely make it obvious.
| Control | Where it usually sits | What it changes | How often you touch it |
|---|---|---|---|
| Stitch selector | Front right dial or screen | Stitch pattern | Every project |
| Stitch length | Dial or screen | Distance between stitches | Often |
| Stitch width | Dial or screen | Sideways needle swing | With zigzag work |
| Tension dial | Top front, numbered | Grip on the top thread | Rarely, and only after rethreading |
| Reverse | Button or lever near the needle | Runs the seam backward | Every seam end |
| Handwheel | Right hand side | Moves the needle by hand | Constantly |
The handwheel deserves a rule of its own: always turn it toward you, never away. Turning it backward can jam thread in the hook area on many machines, and it is an easy habit to get right from day one.
The Parts You Should Leave Alone
Anything behind the outer casing, the motor, the wiring, the circuit board on a computerized machine and the inside of the foot pedal. Those are not user serviceable and there is nothing to gain from opening them. Unplug the machine before you touch anything, even for a needle change.
Timing, the precise relationship between needle and hook, is also a workshop job. When a machine is out of time it makes a distinctive knocking sound and skips constantly, and no amount of rethreading helps. That is the point at which a repair shop saves you money rather than costing it.
Frequently Asked Questions
What are feed dogs and can I turn them off? They are the toothed bars under the presser foot that move the fabric. Most machines can lower them with a switch or a cover plate for free motion quilting and darning, where you move the fabric yourself. Remember to raise them again afterward.
What does low shank mean? It describes the distance from the presser foot screw to the needle plate and determines which accessory feet fit. Most home machines are low shank. Check your manual before buying a walking foot or a quilting foot, as covered in the walking foot guide.
Which part causes most sewing problems? The needle and the thread path, together. A blunt or wrongly chosen needle plus a threading error account for the large majority of skipped stitches, breakage and nests. Start with a fresh needle and a rethread before adjusting anything.
Do I need to oil these parts? That depends entirely on the model. Some machines have oiling points, others are partly self lubricating or have sealed bearings. Use proper clear sewing machine oil if the manual calls for it, never household oil or spray lubricant, and follow the oiling points in the oil guide and your manual.
What is the throat plate and why does everyone mention it? It is the metal plate under the needle, also called the needle plate, with slots for the feed dogs and a hole for the needle. It comes off for cleaning, and the lint that packs under it is a common cause of noise and poor stitch formation.
The Bottom Line
Six parts carry most of the work: presser foot and lever, needle and clamp, take up lever and tension discs, feed dogs, needle plate and bobbin. Learn those and every troubleshooting page suddenly makes sense. Leave the casing, the motor and the wiring to a shop, unplug before changing a needle, and turn the handwheel toward you. Read next: the first seam walkthrough, the needle guide for the part that fixes most faults, and the beginner machine guide if you are still choosing one.